Five Games: Pong (Part 1)
With our preface out of the way we can finally start with making our first game! Now if you skipped the [MAKE LINK]Preface(or if I forgot to mention it in said preface) the code we right here may not be the best way to do things and hopefully it doesn’t seem too messy because in this post I would like to demonstrate how easy it is to get started and how you can keep your solutions very simple. I think you’ll understand what I mean if we just get started.
Every Raylib Project Ever
Since we don’t have an engine to start our project and handle our main loop for us, we have to do it ourselves here. If you look at any example on the Raylib Examples page then you’ll probably have seen this code before. We always start here and I’ll briefly explain each part of it so you atleast understand where we are starting. Read the comments on each line, but you don’t need to write them.
  package pong                                       // Just write this for now.
                                                     // We'll get into this in a later post.

  import rl "vendor:raylib"                          // This is how we add packages in Odin. the 'rl'
                                                     // is what we are going to use to prepend our
                                                     // raylib specific code(seen below)

  main :: proc() {                                   // functions in odin are created like so:
                                                     // func_name :: proc() {}. This is our main

    rl.InitWindow(1280, 720, "Five Games: Pong")     // Here we create our window. Pass it the Width,
                                                     // then the Height, then the window title.

    defer rl.CloseWindow()                           // defer before our CloseWindow() call just calls
                                                     // it at the end. See below

    rl.SetTargetFPS(60)                              // Set our window's FPS

    for !rl.WindowShouldClose() {                    // while WindowShouldClose() is NOT called,
                                                     // we run this loop. This is our game loop.

      rl.BeginDrawing()                              // Between here and EndDrawing() is where we
                                                     // draw our shapes, sprites, etc to our screen.

      rl.ClearBackground(rl.BLACK)                   // This draws a black background every frame of
                                                     // our loop. You can use a different colour too.

      rl.EndDrawing()                                // All our draw calls are done.
                                                     // Now we end our draw section.
    }
  }
There is a lot of text in the comments, but I encourage you to try and just understand the code itself. Raylib has a very easy to understand API so you should be able to explore more examples on your own and learn what everything does. As far as the Odin code I also encourage you to read the Odin Overview to see how the language works. The language is not the focus of this series so I will not be explaining much more past this boilerplate, but it should still be easy enough to follow. And if you want to go off and explore adding your own touches to our games we make here then you’ll have my examples to follow.
Everything is just data
Now that we have taken care of the boilerplate, we can finally start to learn how to make games! First up we are going to talk about data, data structures, and how we can get a concept of something in our head to be something we can use in our game. It can sometimes be difficult to decide where to start when we have an entire game in mind and a nearly blank text editor. So one of the most important skills we are going to start with is to break down that mental image of our game into smaller chunks that we can implement piece by piece. So let me show you a way you can start to breakdown your game into smaller bits you can manage much easier.
When you think of Pong, what is on screen?
- 2 Paddles
- 1 Ball
- 2 Score Counters
What does each element on screen do?
- The 2 paddles move up and down to bounce the ball back to the other side
- The ball bounces against the top and bottom screen edges, and bounces against the paddles
- The 2 score counters increment up by 1 on the side of the paddle who gets the ball past the other paddle
Now we just need to organize this information. A simple way we can try to do this is to create a list for each piece of our game for what it can do. What information does our piece need to have so we can play pong.
Organizing our data
This is a good starting point to create our data and entities or play pieces (you can think of the pieces of our game like chess pieces we need to play chess. I will often call them entities.) So let’s get all this data into our editor so we can operate on it later.
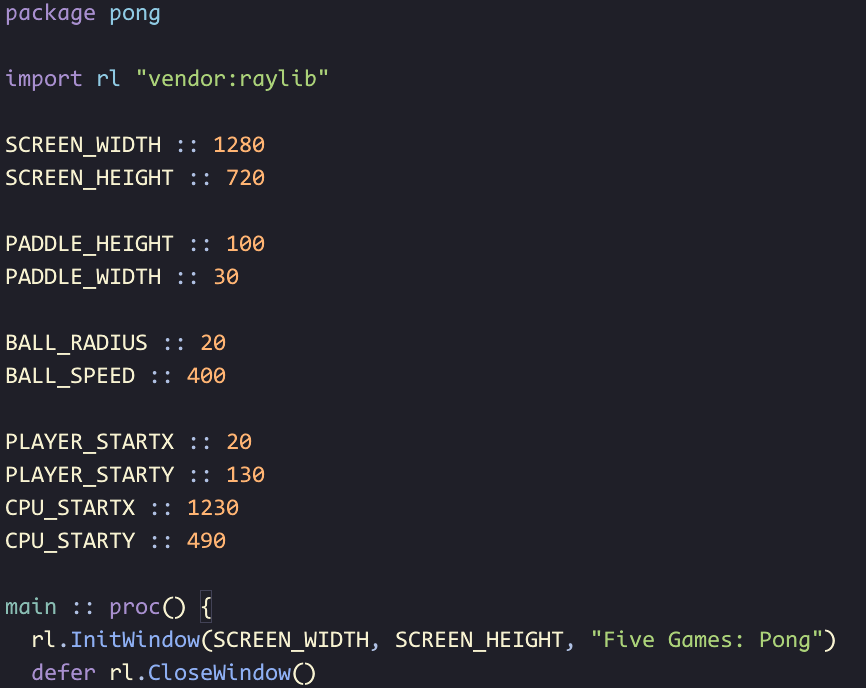
Since we don’t plan on changing this data during our game we can just make them constants. Not something I’d normally do, but this makes it easy to see all our values in one place. As you can also see I’ve added the window resolution values as constants. Again not something we normally do, but this will be useful to use later so I’d go ahead and add these too. We don’t have our positions here because those values do need to change, but we have given our paddles a starting X and Y position. This starting data we have exists, but isn’t really tied to anything. Right now it’s just a set of numbers. Since we know that we’ll have 2 values and 2 score counters though we can organize some data into 2 seperate groups. One for the player and one for the opponent.
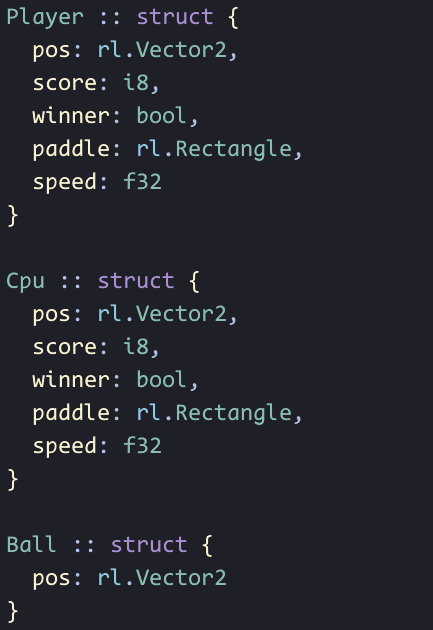
Now this is looking much better. If you are familiar programming with classes then this is basically the same thing. You may be looking a both our Player and Cpu structs and thinking this is a perfect use case for inheritance, but that is a topic we will also address in a later post. We don’t need to overcomplicate things here. Keep it simple smartypants! Now to make sure we’re on the right path, let’s create a new Player and draw them onto the screen. We have our data so let’s use it and see if it works.
The docs will be your best friend
So I hope that all of the above was pretty simple and straight forward. You should be able to start any game project and have an idea of at least some of the data and entities that you need to make for your game, but now we are at a point where we have no idea what to do next because we have no idea what any of our tools can do. This is the part you need to understand how to navigate when you don’t have a tutorial infront of you telling you what to do. This is where you really learn to make games so don’t run from that discomfort of feeling lost.
Now I am going to get you started with some of the code, but when we need to draw our player’s paddle to the screen, you’re all on your own. I am also going to make one change to make things a bit cleaner, but first I am going to see if you can find what I want to change and why. Try to not read past the image and spoil yourself.

Can you see anything unnecessary in our code here? The code here still works so it’s not like you can’t use it exactly as it is. A problem I see is (spoiler alert) that we create a position variable for our player, only to just pass it to the position of our players paddle variable. Now in the pong that we are making our players visual position and actual position is always going to be the exact same so we can just use the x & y in our player.paddle rectangle. So we can remove the pos fields from CPU, Player, and remove it from the initialization we just showed here. Then just initialized the x & y(the first 2 fields of our paddle rectangle) to PLAYERSTARTX & PLAYERSTARTY. After that we draw our player to the screen and if someone asks you anything about a color, you tell them rl.WHITE.
One final tip since you may be brand new to programming and I haven’t really covered this yet. When we made our structs and gave it properties we wrote them like name: type. In raylib’s cheatsheet you will see a bunch of functions with similar names & types inside parentheses. Try to find a function that sounds like it does what we want and match the type inside the parentheses. If player.paddle = rl.Rectangle then try to find something that has a Rectangle inside the parentheses. This might be really tough depending on your programming knowledge, but do your best. It’s always the hardest the first time. [TODO: EXPLAIN HOW TO BUILD AND RUN OUR GAME] Now our game should look like this when we run it:
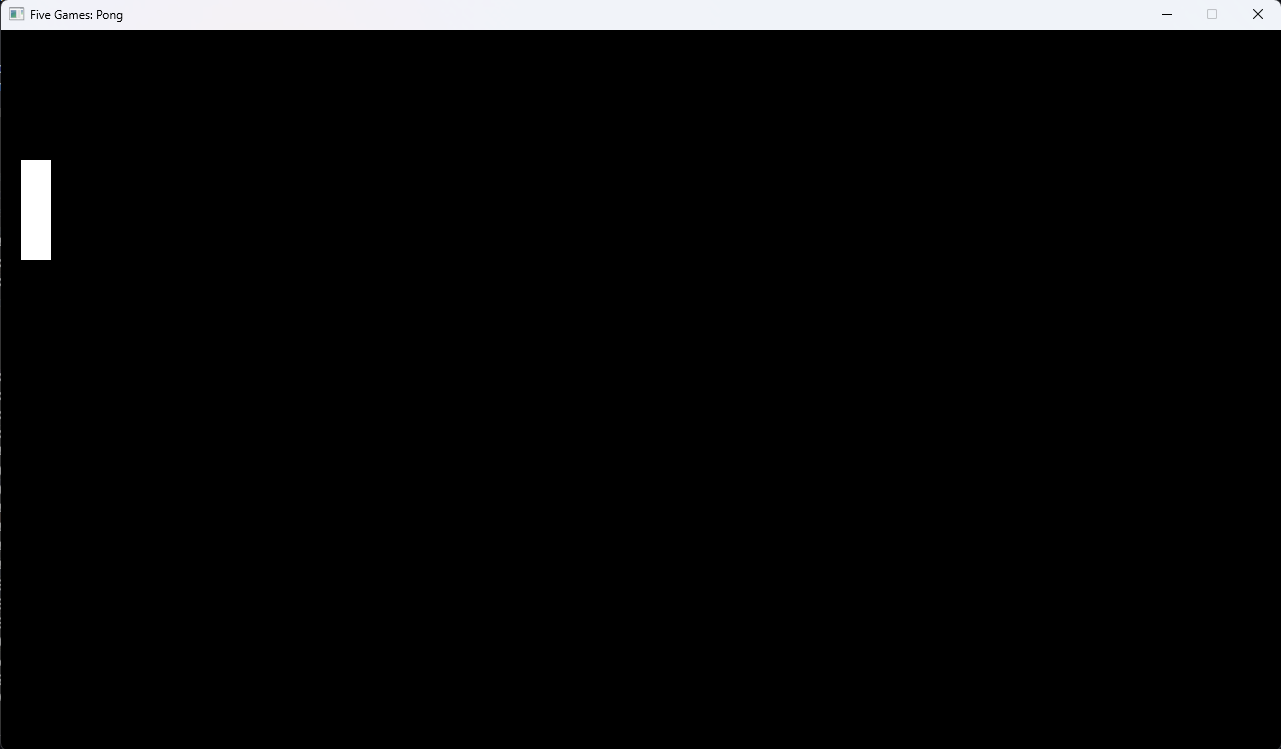
Easy right? No? Did you go the the Raylib Cheatsheet and Ctrl+f Draw? Rectangle? Maybe Both? Fortunately the Raylib API is pretty well made so it’s easy to find and use anything you need to. Whenever I have something in my mind like “Draw the player to the screen” I just go to the documentation and search for those keywords. Any framework worth using will have names that pretty clearly state what it does.
I mean… we’re basically done right?
So what now? If we can draw our player on screen in the position we specified then we can also draw the CPU, the ball, and the scores. Once we make them all move then we’ve made our first game. So how do we make them move? When is the player paddle supposed to move? If the player is pressing A key then we move the paddle at the set speed. Before we write this code let’s give our player a speed so they can actually move. Additionally we need to create our delta variable. If you do not know why we need a delta then I suggest reading up on it, but in short, it’s a way for us to calculate time independant of frame rate. So someone on 30 FPS will play at the same speed as someone on 120 FPS. Since you’ve made it this far I’ll also show you what I did to draw my player paddle.
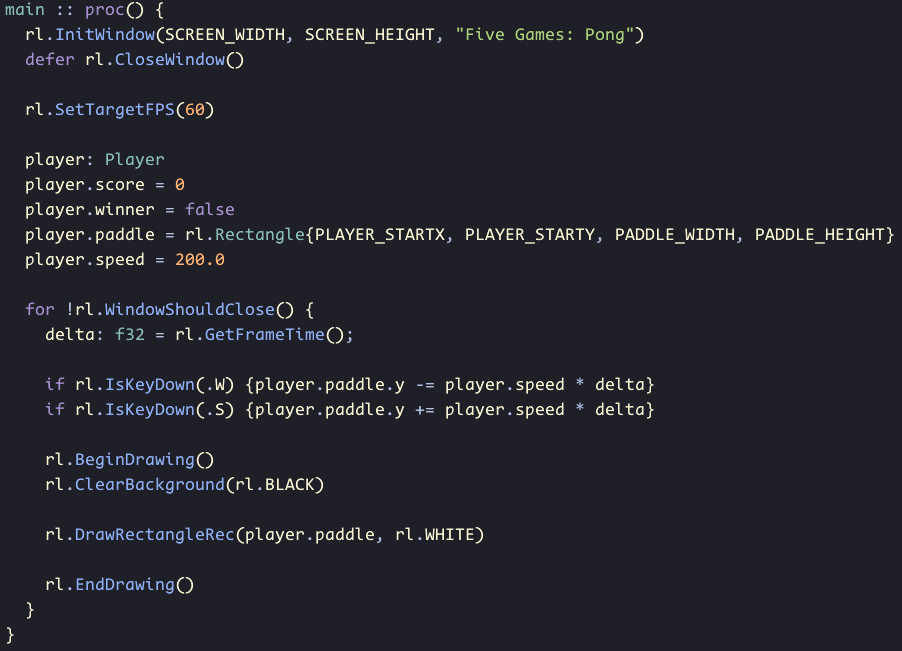
Now we would be done if moving the ball and creating a CPU opponent was just as simple, but we have a bit more work to do here. We also need collisions to have the ball bounce off the correct targets, we need to make sure our paddles don’t go off the screen, we need to keep track of score and reset the gamestate when someone scores, and having a start screen and end screen would be pretty cool too. Now this is starting to sound like a lot, but we can just take it one step at a time like we did with the above parts.
Managing all our game data
First let’s tackle the problem of needing to start, run, reset, and end our game. Much like how we created structs to hold all of our Player, CPU, and Ball data, we can create a structure to hold all of that data. So now when we need to initialize our entities or reset their positions we just do all of that through our game data structure.
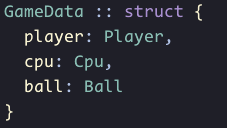
Once we have created our struct we can initialized our struct the same way we did our player earlier, but this time we won’t set all the values here. To keep our main function cleaner we can create a new function that handles setting all of our game data to the correct starting values.
Now something that I am going to use something really scary here and that is both a pointer and a reference. I don’t want to go in depth into how these things work as I think it would take a bit of time to teach someone(I want to wrap up this post and this is not the focus of this post) and there are already great resources out there to learn about memory management, pointers, etc. I think it is something that everyone should learn if they are going to make computer software and a great way to learn it is with Nic Barker’s Memory Management videos on Youtube. There are–at the time of writing this post–2 parts currently out(and maybe there will only be 2 parts) that are very well put together and a much better place to learn about the topic than this blog here.
To quickly explain at a very high level what we are doing here, when we initialize our data, that data is stored somewhere in memory. Our function wants to access that specific data in memory so it needs to take a pointer to the data’s location in memory. When we use that function we give it our data with the ’&’ prepending the name. That ampersand can be though of as ’address of’. We do all of this so that we can operate on one set of data instead of creating copies of that data. If you don’t understand this now that’s fine, if you’re curious about it then check out the video linked above, if you want to just continue on then let’s do exactly that.
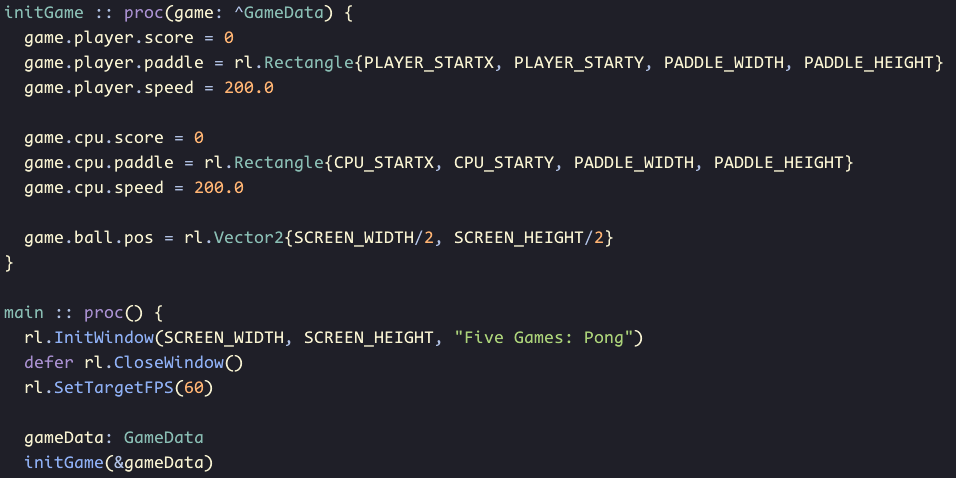
To clean things up further I have decided to remove our winner variable from the struct which means we also do not need to initialize it. Once the function has been written then I also call it after we create our gameData structure. Now that we have all the data we needed from our list much earlier in this post, let’s draw it all on screen. Now there’s also one change we need to make while we are here in our game loop again. Since all of our data is inside our gameData struct, we need to access it by putting gameData. before anywhere we use player data. I’m sure you could also tell that to access the data in our structs we ’.’ to access the next level down, kinda like choosing our branching path.
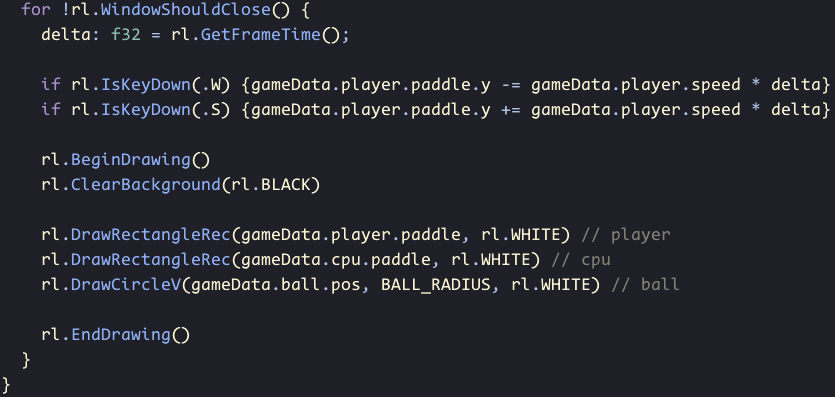
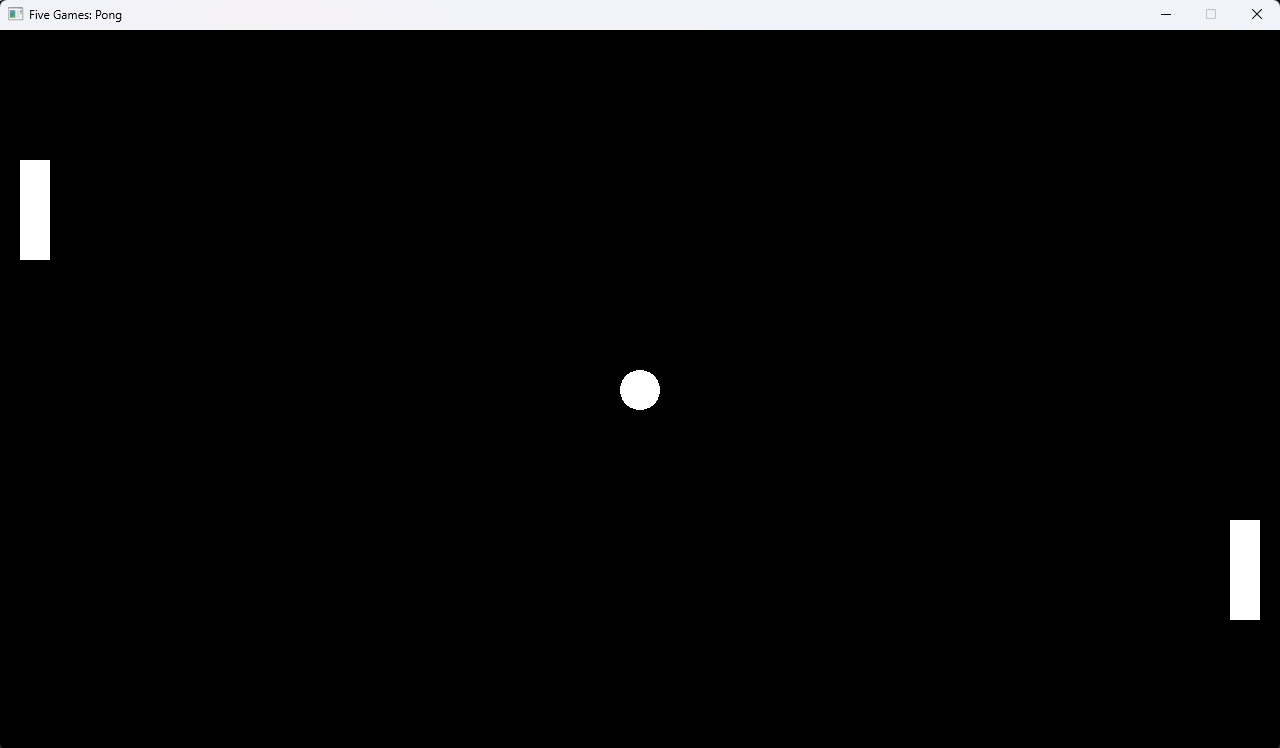
Now when we run our game we get this result:
The Ball
We have all of our pieces on screen so now we can finally start playing with them. So first let’s get the ball moving. We’ve seen above how we update movement with input from the player, but now we want the ball to move on it’s own and bounce off the correct targets. To start with we’re going to add a new property to our ball and we’ll see why we need it as we make progress on our ball’s movement. Add velocity: rl.Vector2 after position in our Ball struct and don’t forget to add a comma after the position property, just like we have in our other structs. Next inside our initGame function, we can set our ball’s velocity to {1.0, 1.0} so that we can see if it moves when we first run our game. Now inside of our game loop before our draw scope, we can update our ball position similar to how we update our paddle:
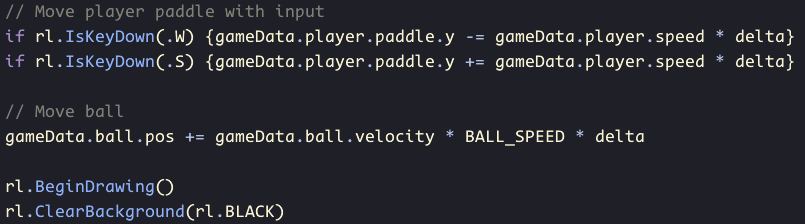
IT MOVES… IT MOVES OFF THE SCREEN… just like our paddle can. Let’s fix that next. We’ll make our ball bounce of the top and bottom of the screen first and then we’ll fix our paddles going offscreen. The ball one is simple. First let’s make another small and simple function. Now if we were inside something like Godot or Unity and our Ball was a class, we might create a method on the ball that we can call when we want it to bounce or reverse direction. You might call that method like gameData.ball.reflect(). Even though Odin doesn’t have methods for structures, we can see with this basic example how we can adapt when our tools change with a basic understanding of how these things work. We can add this new function in the same place we added our initGame function.

So simple we can keep it all on 1 line. What this is doing is it’s taking in a floating point value as v, then the -> f32 just means that this function–unlike the others we’ve made so far–is returning a floating point value. If you’re familiar with C-like languages this is like writing float reflectBall() {...}, while something like our initGame would be written like void initGame() {...}. What this function will do is take in one of our velocity values, multiply it by -1.0, and return that number. This will flip our value from negative to positive and vice versa. This is how we reverse our direction. Now we can call this function on our ball’s y velocity under the condition it hits the top of bottom of the screen.

This statement reads “if the center our ball’s position + it’s radius is greater than or equal to our game windows y resolution OR if it’s less than 0(the top of our screen) then make the ball’s y velocity equal to itself times -1.” The ball’s radius is added onto the ball’s position because it’s position is only the center of the circle. We want the edge of the ball to bounce so we add(or subtract) that value from the center point and that will bounce the ball if the edge of the ball collides. Now if we run our game it bounces! Now we just need to do the same this for it’s x value if the ball collides with our player paddle.
Now because our paddles are not static we probably want to check collisions differently than we did for our screen edges. Once again before I give you the answer, see if you can search the raylib cheatsheet and find something that could help us here. While you do that, I am going to make sure our paddles don’t go off screen. This is a keyword that you may not have heard of before in the context of programming so this I’ll just give to you. Not all languages will have this built-in, but fortunately Odin does and that’s great.

Clamp will take in our value and limit it to a minimum and maximum amount. Simple and convenient. Now hopefully you’ve found something to check for collisions with our ball’s circle and our paddle’s rectangle. Something like this:
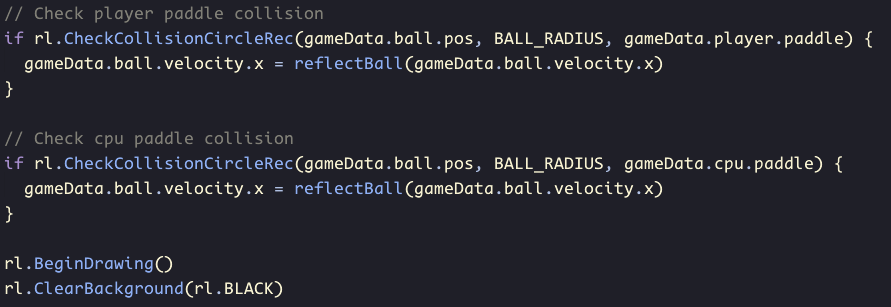
We can change our ball’s starting velocity to {-1.0, -1.0} to send the ball our way and make sure it’s bouncing correctly.
Now we’re really forsurely definately basically finished this time right?
Yeah kinda. We’re really just repeating what we did before by tackling the small problems one at at time. To make the player experience a little smoother and more complete we can quickly add functions to call to reset the game state after scoring and require the player to press a key like spacebar to begin the game. Our function to reset game will look very similar to our init, but we obviously don’t want to set our score to 0. What we can do to make things easier is remove the score from our player & cpu structs and add it to our gameData as a Vector2. We could also make our own Score struct and add that struct to our gameData. Let’s try one of these methods and see if we like it.
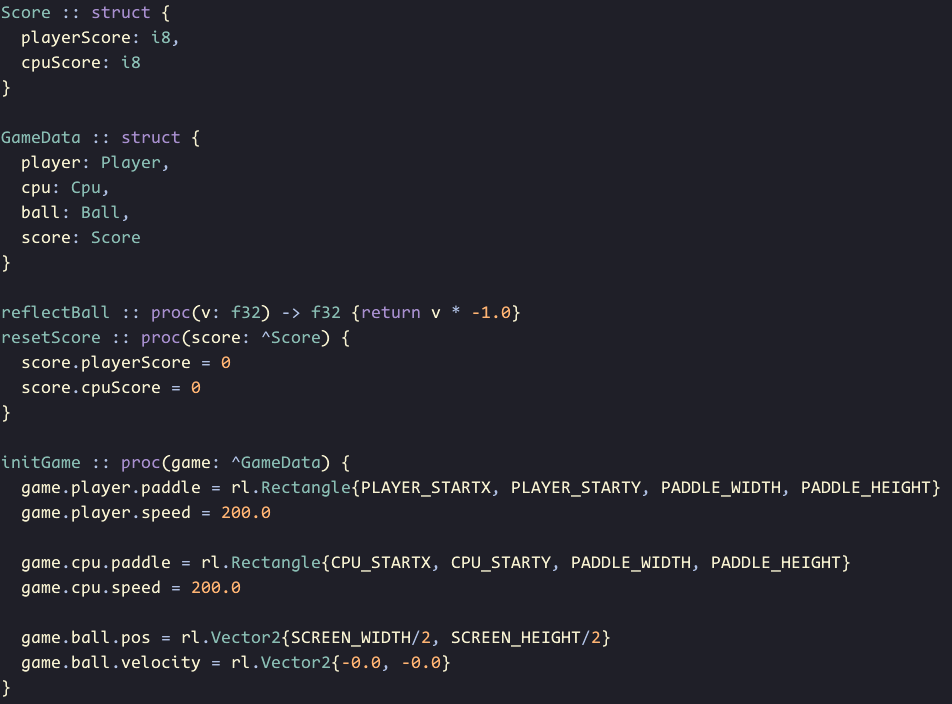
Now that we have this let’s get it drawn on screen and have it update the score when someone scores. You can copy a lot of this code here and just do you best to read and understand it. All I’m doing is turning the score values into a formatted text variable, then measuring that text at a font size of 64, then in our draw section I the text at half the screen width minus half the text size, 10 pixels from the top with a font size of 64 in white. All done through raylib. I learned that raylib could do this stuff through searching the cheatsheet. Remember, it’s your best friend here.
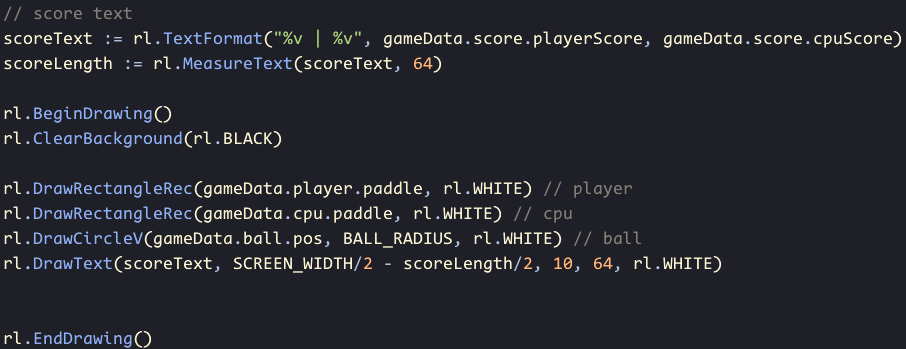
This file might be getting a bit overwhelming with all the code we kinda have all over the place, but we are going to do our best to finish it all in this one file. You’re almost there! Just like our other collision checks, we can add a conditional statement to say if the ball goes past the sides of the screens, we’ll add 1 to the scoring players score and call initGame(&gameData) to reset the positions. 0 is the left screen edge and SCREENWIDTH is the right.
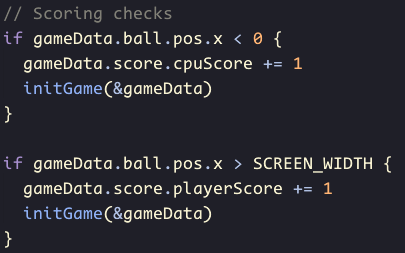
Now if you set the ball’s velocity to {1.0, 1.0} and score you will see the code in action, but now let’s do something cool. Let’s have our ball move in a random direction everytime we start the game. Exploring the Odin Packages Page we can find some cool stuff. At the top of our file where we import raylib, let’s add import "core:math/rand". This will give us access to some cool math functions that come included with Odin. One of those functions being rand.float32range(). If we search for this in the docs we can see an example of how to use it. The language docs will also be your friend when you are programming your games.
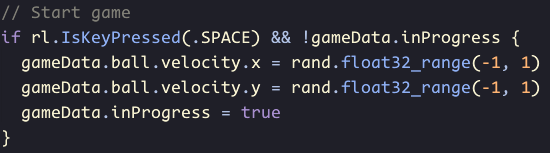
You can see here that we are using a new gameData variable. Add this to our GameData struct and initialize it to false. Make sure you initialize the ball velocity to 0.0 aswell. Now we press space and the game will begin! But wait… is the ball moving slow for you too? Have any ideas why this might happen?
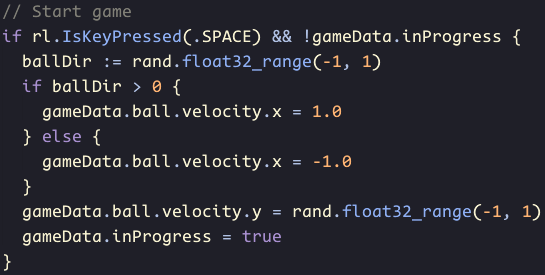
That’s better. Look how easy the solution was. Now I am going to show you how to actually get the CPU opponent to fight back. He’s tired of sitting and watching and he wants to play too. We’ll do all of the CPU moving logic inside it’s own function to keep things a bit more organized. Now with this you have a lot of freedom in choosing how you want your CPU to play. This is also where it can get fun for the player as you can throw in tricks and behaviours that the player can discover on their own, learn, and overcome. Let’s look at a solution of mine and briefly go over what I had in mind when I wrote it. Also a little spoiler, we use a lot of if statements again. We are just trying to keep it simple and use what we know. We’ve learned a lot already(I hope) so let’s just focus on finishing out first game.
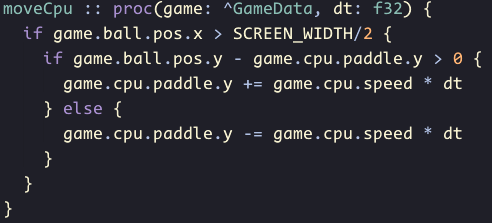
Now we’ve got a game on our hands! Remember to call this function with the rest of our movement code in our game loop. You may or may not run into the issue of our ball collision not working as intended if it collides with top or bottom of a paddle. Let’s fix that too.
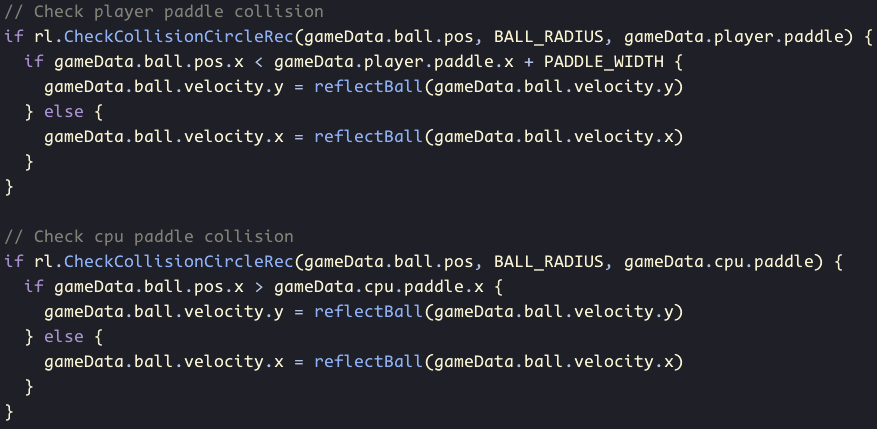
That should work. All I’ve done is added another check to see if the center of the ball is past the front edge of the paddle. If it’s past that edge then it probably means it has it a top or bottom edge and will bounce along it’s y axis instead of the x. The paddle’s x values and the x value of pretty much everything in raylib will usually be the on the top left corner. If you have experience with 3D art tools, you can think of this as the origin point. So for the players paddle if x is on the left edge, we need to add the paddle’s width to get the right edge.
Before we begin to wrap up, feel free to change any of the speed or size values to something you find enjoyable.
We’re finally done aren’t we
Yes we are finally done. Well I am, but you’ve got homework. Right now our game has no end. Try exploring the code you’ve written and raylib’s cheatsheet to get a game over screen. Some tips for getting that done:
- Draw some text to the screen to give the player prompts to start and restart the game. Look at the DrawText function we have right now for an example. We don’t need to create a text variable this time though. We can just pass it text in “double quotes”.
- Right now anytime we score the game will call initGame. If we want a different gameover state then think about what condition would trigger that state.
Conclusion
We’ve made pong. It’s not perfect, it’s got it’s problems for sure, but we’ve learned a few things that will help is in our other projects going forward. The most important things I would like to reflect is the way we took a mental image and turned it into working code. This post ended up being a lot, especially towards the end and we tried to clean up the game and turn it into more of a game, but if I were to ask you to make our next game in this series, a breakout game, can you image how you would begin to tackle this after doing what we did here? Can you think of all the pieces of our game that appear on screen? What data those pieces need? How we can operate on that data and draw it all to our screen? And when we get stuck on don’t know what code will fix our problem, where we can go to find possible solutions? If you’ve already got some ideas then I encourage you to go take a shot at it on your own! That is the best way to learn after all!